Bed Leveling Guide
Unlevel beds are a common issue with most FDM 3D printers. Because these beds sit on springs and are generally exposed to large heat fluctuations, beds can easily become unlevel with time.
- Note, this page is currently under construction
Symptoms of an Unlevel Bed
If a 3D printer has an unlevel bed, there are a few symptoms that may arise.
- Filament does not stick to the bed on the first layer and "spaghettifies" (see Figure 1)
- Filament is not properly "squished" between layers (see Figure 2 and Figure 3)
- On the first layer, the filament is too squished and the nozzle is rubbing on the bed (If this is the case IMMEDIATELY stop the print!)
- Filament is warping during the print
- If you notice symptoms 1 or 2 occurring, the nozzle is not close enough to the bed.
- If you notice symptoms 3 or 4 occurring, the nozzle is too close to the bed.
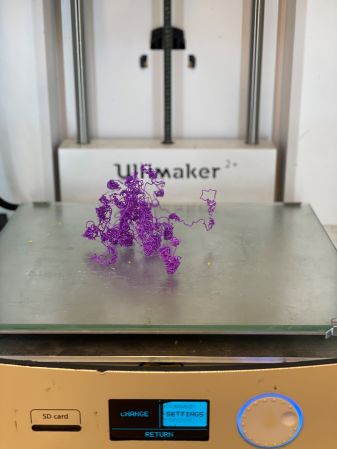
Figure 1: Spaghetti

Figure 2: Benchy with good layer adhesion

Figure 3: Benchy with bad layer adhesion


Fixing an Uneven Bed
Thankfully, fixing an unlevel bed is very easy and can be done by those with very little 3D printing experience. Below are in depth guides to fixing this issue on different printers.
Prusas
The Prusa Mk3s that we have in the processing section is equipped with an auto levelling bed. If any of the aforementioned symptoms arise, there is another issue at work. Please contact a TO or the CTO in this case!
Ultimakers
The Ultimakers have a built in bed levelling wizard that helps guide the user through the process.
- As with any procedure relating to 3D printer maintenance, first make sure the bed and nozzle are completely cooled and safe to work with!
- To start the wizard, scroll to Maintenance>Build Plate
- Wait for the printer to go through its homing procedure. The display will give you a prompt to begin the wizard (NOTE: Once you begin the wizard, you must go all the way through or else it will reset the Z-offset value!)
- The first step of the wizard is to set the bed height to approximately 1mm away from the nozzle. This does not have to be precise, just make sure that the bed is close to the nozzle but NOT touching it.
- Next, the printer will prompt you to check this height at the corners of the bed. Make sure that the gap between the nozzle and the bed looks similar to the original gap in the previous step.
- If the gap does not look similar, adjust the corner height with the thumbscrews on the bottom of the build plate.
- After you finish rough tuning the corners, the display will prompt you to move the bed up to redo the previous steps but with a smaller gap.
- This gap can be checked with the width of an index card. The card should be able to slide under with some resistance but you should not have to force the card. NOTE: Make sure you don't put pressure on the bed while doing this or else you will have to restart!
- Repeat step 5 with this new height
- Print a test model (Rocktopus, benchy, etc.) and see if the printer works as expected
- If it doesn't, repeat this procedure. Bed levelling is a skill and gets better with practice.
Other Printers
Levelling most other FDM printers is similar to levelling an Ultimaker 2+. However, because there may be a proprietary levelling mechanism, it is always best to check the printer's manual first. If there is not a specialized levelling mechanism (i.e the bed is on springs attached to thumbscrews) the procedure is as follows:
- Make sure the nozzle and bed are cool and safe to work with!
- Home the printer so that the nozzle goes to the first printing position. If this is not the homed position, start a print and turn off the printer before it starts the first layer (and then let it cool back down!).
- If the printer is still on, disable the stepper motors through the UI or turn off the printer.
- If you do turn the printer off, make sure to move the extruder very slowly as to avoid any damage from ESD
- Use an index card to check the gap between the nozzle and the bed at the center of the bed. This should give you a good idea of if the entire bed needs to move or not. NOTE: Do not put any pressure on the bed itself! This will give you incorrect results and you will have to start over!
- When checking with an index card, there should be some resistance from the nozzle but not too much. This is an acquired skill and takes time to perfect.
- Move the extruder to the front left corner of the bed (immediately on top of a thumbscrew) and check the gap there.
- Adjust the thumbscrew until the index card just barely rubs the nozzle.
- Repeat step 5 for all corners. Go along diagonals (i.e from front left to back right)
- Once the corners are levelled, check the space in between the corners. Adjust the thumbscrews accordingly
- Go back over every point to check the space between the nozzle and the bed. You should check 9 points in total.
- Print a test model (benchy, rocktopus, etc.) and check if it works properly