Microhardness
| LECO Microhardness Tester [SOP] |
|---|
| Objectives: 10x, 50x |
| Indenters: Vickers, Knoop |
| Load Force: 5-2000gf (0.05-19.61N) |
| Dwell Time: 0-20s |
| Standard Comformation: ASTM E-384, JIS B-7734, ISO 4545 (Knoop), and ISO 6507 (Vickers) |
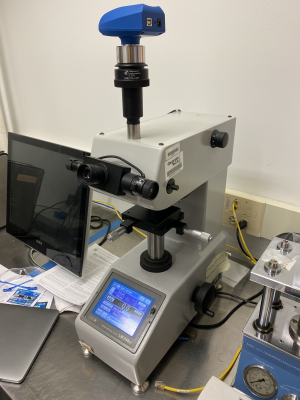
The LECO LM 248 AT is a hardness tester that is designed to measure the hardness of materials on the microscopic level. The machine can magnify a surface as much as 50x and measure the hardness of a sample on the Vickers, Knoop, and Rockwell C scales. Hardness testing is used for two general characterizations: material characteristics (such as confirming material, testing hardenability, and predicting tensile strength) or functionality (testing wear resistance, toughness, and resistance to impact).
Introduction
Hardness tests are a simple method to determine the resistance of a metal to plastic deformation.[1] Indentation tests constitute the vast majority of hardness tests and can be divided into three classes: nanoindentation, microindentation, and macroindentation (based on the indentation load used). The smaller the indentation, the harder the material. Both the yield stress and the work-hardening characteristics of the metal are important in determining the hardness. Hardness is not considered a fundamental property of a material; it represents a quantity measure on an arbitrary scale. There are several different methods used for hardness testing, which use varying shapes of indenters and loads. The MILL’s Leco LM 248AT comes with Vickers and Knoop indenters and calculates Rockwell C hardness from whichever of these scales is being used.
Preparation
The following precautions are recommended for reproducible results in hardness testing:[2]
- The indenter and anvil should be clean and well seated.
- The surface to be tested should be clean, dry, smooth, and free from oxide. A rough-ground surface is usually adequate for a Vickers macro-hardness test, while the Knoop indenter requires pre-polishing of the surface to a microscopic grade.
- The surface should be flat and perpendicular to the indenter. Any specimen movement during indentation can cause deformed indents.
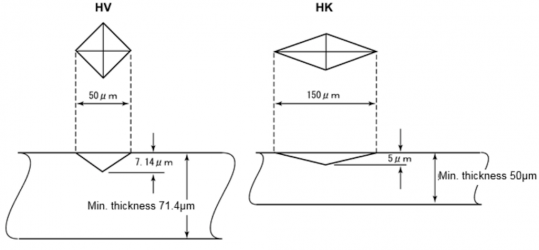
- The thickness of the specimen should be such that a mark or bulge is not produced on the reverse side of the piece. It is recommended that the thickness be at least 10 times the depth of the indentation. Tests should be made on only a single thickness of material.
- The spacing between indentations should be at least 3 times the longest dimension of the indentation, to avoid interaction between the work-hardening regions.
Macro-indentation Tests
The Rockwell test is popular and convenient, since there is no need to measure the depth or width of the indentation optically. This testing procedure is illustrated below. A preload is applied prior to the application of the main load. The dial of the machine provides a number that is related to the depth of the indentation produced by the main load. A Brale indenter, a diamond cone with an angle of 120°, is used in Rockwell C tests. The Rockwell C scale is usually used for harder steels.
The Vickers test uses a diamond pyramidal indenter with a square base, with an angle between the faces of 136°. One of the known advantages of the Vickers test is that one indenter covers all the materials, from the softest to the hardest. The load is increased with hardness, and there is a continuity in scale. The Vickers hardness (HV) is computed from the equation below:
[math]\displaystyle{ HV = \frac{2P \cdot \mathrm{sin(\alpha/2)}}{d^2} \approx \frac{1.8544P}{d^2} }[/math]
where P is the applied load (in kgf), d is the average length of the diagonals (in mm), and α is the angle between the opposite faces of the indenter (136°). Conversion to MPa is accomplished by multiplying this value by 9.81. After the indentation, both diagonals of impression are measured, and their average is taken. If the surface is cylindrical or spherical, a correction factor (ASTM Standard E92, Tables 4 through 6) has to be introduced. Microhardness tests utilize a load lighter than 200 gf, and very minute impressions are thus formed; a load of 200 gf produces an indentation of about 50 μm for a medium-hardness metal. These tests are ideally suited to investigate changes in hardness at the microscopic scale. One can measure the hardness of a second-phase particle and identify regions within a grain where differences in hardness occur. Micro-hardness tests are also used to perform routine tests on very small precision components, such as parts of watches. When a metal is alloyed, the distribution of the solute is not even throughout the grain, due to the stress fields produced by the solute atom. The solute atoms often tend to segregate at the grain boundaries, significantly increasing or decreasing the hardness in these areas. This effect can be noted at extremely low concentrations of solute (a few parts per million).
Micro-indentation Tests

The two most common micro-indentation tests are the Knoop and Vickers tests. The Knoop indenter is an elongated square pyramid, while Vickers indenter is a regular square pyramid.
The hardness is obtained from the surface area of the impression and is given by:
[math]\displaystyle{ KHN = \frac {14229P}{L^2} }[/math]
where P is the load of gf and L is the length of the major diagonal, in micrometers.
Dwell Time
The ASTM specification for dwell time is 10 to 15 seconds. The dwell time can be changed to meet a specific requirement. As a general rule, a shorter load time is preferable as it reduces the chances of outside influence (vibration, etc.) on the tester.[3]
Distance Between Indentations
Spacing indentations too close together can cause the test piece to become “work hardened” in that area, resulting in false readings. Be sure to maintain proper spacing between indents, in all directions.
Vickers vs. Knoop
The Vickers Hardness test has two significant advantages:
- Geometrically similar indentations and relatively constant hardness values are obtained, regardless of the loads applied, as long as test specimens are homogeneous.
- Materials ranging from extremely soft to extremely hard can be tested without changing loads.
The Knoop Hardness test should only be used for measurement of extremely thin plates and brittle materials that cannot be measured by ordinary Vickers Hardness tests. The geometric shape of Knoop indents does vary with the load used.
Micro-hardness vs. Macro-hardness
There are several problems with the extrapolation of micro-indentation testing to macro indentation results. First, almost invariably, the micro-hardness of any material is higher than its standard macro-hardness. Additionally, the micro-hardness varies with load. Second, there is a tendency for the micro-hardness to increase (up to a few grams); then the hardness value drops with load. At very low loads, one is essentially measuring the hardness of a single grain; the indenter ‘‘sees” a single crystal, and the plastic deformation produced by the indentation is contained in this grain. As the load is increased, plastic deformation of adjoining grains is involved, and a truly polycrystalline deformation regimen is achieved. Grain size has a marked effect on the yield strength and work-hardening characteristics of metals. Yet another potential source of error is the work-hardening introduced in the surface by polishing. The effect of crystallographic orientation, when the impression is restricted to a single grain, is of utmost importance. It is well known that both the yield stress and the work-hardening are dependent on the crystallographic orientation of the material.
Relationships Between Yield Stress and Hardness
For non-work-hardening (brittle) materials, hardness is equal to three times the yield stress (H = 3σy). Since there is a lot of plastic deformation under the indenter, in work-hardening (ductile) materials yield strain cannot be used. The mean plastic strain under the indenter is described by the following equation:
[math]\displaystyle{ {ε_p} = \frac{d′}{5D} }[/math]
where d′ is the diameter at the top of the pileup and D is the diameter of the indenter. For d′/D = 0.375, a reasonable value for indentation, the plastic strain, εp = 0.075. Hence, for work-hardening metals, one should take the flow stress at a plastic strain of 0.375 before multiplying it by 3 for a good correlation with the hardness.
Converting Between Scales
If the desired hardness scale cannot be measured by the Leco tester, a conversion table such as this[4]. may be used to find the value on the desired scale. It should be noted that not all hardness scales cover the same range or are designed for the same materials.
References
- ↑ Meyers, M., & Chawla, K. (2016). Hardness. In Mechanical Behavior of Materials (2nd ed., pp. 214–225). chapter, Cambridge University Press.
- ↑ NEWAGE Hardness Testers. (n.d.). Hardness Testing Basics. NEWAGE Hardness Testers - Rockwell Testers, Brinell Testers, Microhardness Testers, Optical Systems and Hardness Testing Software. https://www.hardnesstesters.com/test-types/hardness-testing-basics.
- ↑ 3.0 3.1 LECO Corporation. (2017). Lm Series Digital Microindentation Tester Instruction Manual.
- ↑ Hardness Conversion Chart. PGI Steel. (n.d.). https://pgisteel.com/hardness-conversion-chart/

